
Introduction
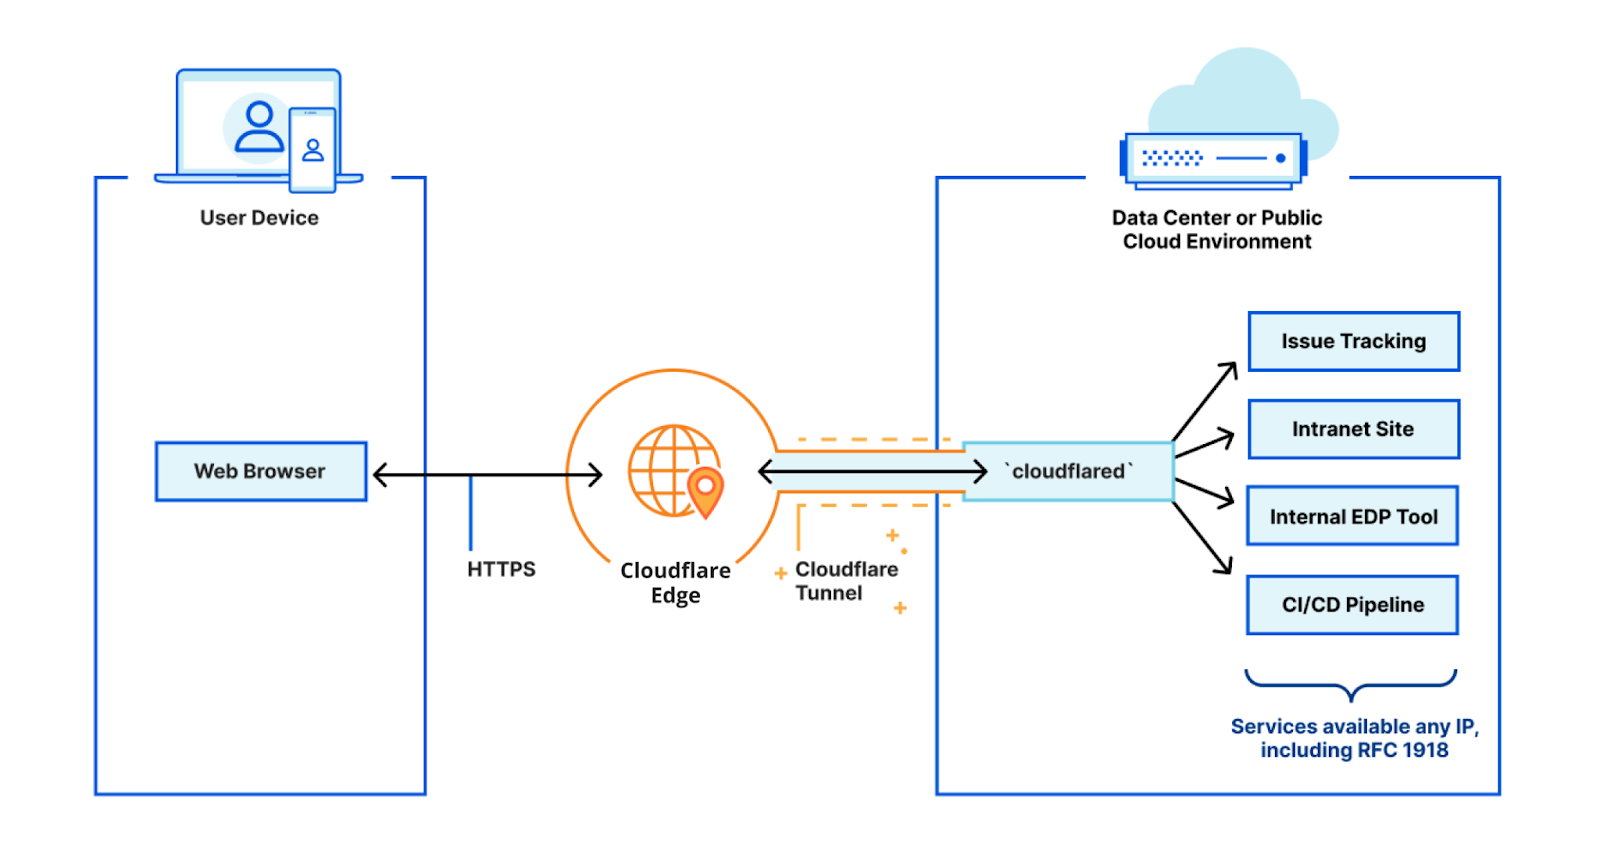
Exposing a local service to the internet is a common need for developers and IT professionals. Traditional methods require opening ports on your router or firewall, which can be complex and introduce security risks. Cloudflare Tunnel provides a secure, simple, and reliable way to expose local Linux services to the internet without opening your local network and expose your IP Address.
Key Benefits
1. No Open Ports or Public IP Needed Cloudflare Tunnel does not require you to open any ports on your router or firewall. Your local service communicates outbound to Cloudflare, so your network remains protected.
2. Enhanced Security
- IP Masking: Your real server IP is hidden behind Cloudflare’s infrastructure, reducing exposure to attacks.
- Encrypted Traffic: All communication between your local Linux service and Cloudflare is encrypted.
- Automatic SSL Certificates: Cloudflare provides free SSL certificates for your tunnel, ensuring secure HTTPS connections.
3. Simple and Reliable Setup
- Fast Deployment: Set up a tunnel in minutes with just a few commands.
- Custom Domains: Use your own domain for a professional look, or use a temporary Cloudflare subdomain for quick testing.
- Global Network: Cloudflare’s worldwide infrastructure ensures fast, reliable access for users anywhere.
4. Persistent Service
- Run as a System Service: Easily configure
cloudflaredto run as a systemd service on Linux, ensuring your tunnel stays online even after reboots.
5. Flexible Configuration
- Multi-Service Support: Expose multiple local services through a single tunnel, each with its own subdomain or path.
- Easy Management: Update configuration and restart the service as needed.
Step-by-Step Implementation (Linux)
Prerequisites
- Cloudflare account (free)
- Domain
- Local service running on Linux (e.g., web server on
localhost:8080)
1. Install cloudflared
Download the latest cloudflared package for your architecture. For most x86-64 systems:
wget https://github.com/cloudflare/cloudflared/releases/latest/download/cloudflared-linux-amd64.deb
sudo dpkg -i cloudflared-linux-amd64.deb
Or, for manual installation:
wget https://github.com/cloudflare/cloudflared/releases/latest/download/cloudflared-linux-amd64
sudo cp ./cloudflared-linux-amd64 /usr/local/bin/cloudflared
sudo chmod +x /usr/local/bin/cloudflared
Check the installation:
cloudflared --version
2. Authenticate with Cloudflare
cloudflared tunnel login
This will provide a URL. Open it in your browser, log in to your Cloudflare account, and select the domain you want to use.
3. Create a Tunnel
cloudflared tunnel create my-tunnel
Note the tunnel UUID shown in the output.
4. Configure the Tunnel
Create a configuration file at ~/.cloudflared/config.yml:
tunnel: <tunnel-UUID>
credentials-file: ~/.cloudflared/<tunnel-UUID>.json
ingress:
  - hostname: demo.yourdomain.com
    service: http://localhost:8080
  - service: http_status:404
Replace <tunnel-UUID> with your actual tunnel ID.
5. Create a DNS Entry
cloudflared tunnel route dns <tunnel-UUID> demo.yourdomain.com
This will automatically add a CNAME record in Cloudflare DNS for your tunnel.
6. Start the Tunnel
cloudflared tunnel run my-tunnel
Your service will now be accessible at https://demo.yourdomain.com.
7. (Optional) Run as a System Service
To ensure the tunnel stays up after reboots:
sudo cloudflared service install
sudo systemctl enable cloudflared
sudo systemctl start cloudflared
Check the service status:
sudo systemctl status cloudflared
Conclusion
Cloudflare Tunnel is the ideal solution for securely exposing local Linux services to the internet. It eliminates the need for complex network configuration, enhances security, and provides reliable, persistent access—making it perfect for development, testing, and production use on Linux.
Sources
- https://developers.cloudflare.com/cloudflare-one/connections/connect-networks/do-more-with-tunnels/local-management/as-a-service/linux/
- https://gist.github.com/obrassard/ba6a15ef8719c7a7c3e0f4947893c97f
- https://tcude.net/creating-cloudflare-tunnels-on-ubuntu/
- https://docs.pi-hole.net/guides/dns/cloudflared/
- https://omar2cloud.github.io/cloudflare/cloudflared/cloudflare/
- https://documentation.breadnet.co.uk/kb/cloudflared/cloudflared-on-ubuntu-for-ssh/
- https://developers.cloudflare.com/cloudflare-one/connections/connect-networks/do-more-with-tunnels/local-management/create-local-tunnel/
- https://developers.cloudflare.com/cloudflare-one/connections/connect-networks/downloads/
- https://developers.cloudflare.com/cloudflare-one/connections/connect-networks/get-started/
- https://learnaws.io/blog/cloudflare-tunnel
Post Image: https://blog.cloudflare.com/getting-cloudflare-tunnels-to-connect-to-the-cloudflare-network-with-quic/