In today’s digital world, staying organized is key to maximizing productivity. As someone who get used to scan all important and relevant documents received at home for easier retrieval, I arrived at a point where I have a lot a documents in a “Scan” Folder and it became more and more difficult to search for a document.
Of course, the easiest solution is to classify directly the documents when they are scanned. But 😃, we can accelerate this using AI solutions. I started to investigate how to assign several tags automatically to the scanned files based on a predefined list and or by new ones determined from the text content !
This article describes the built solution step-by-step in a Nextcloud environment.
Process
I personally love Nextcloud and all the possibilites the platform can offer: It’s easy to setup, open source, secure, there is a wide variety of extensions possible, … I started to use it several years ago and still very happy with it. That’s why I decided to develop the solution by creating a plugin for Nextcloud.
The schema bellow explain the global overview of the process to assign the tags to a file.
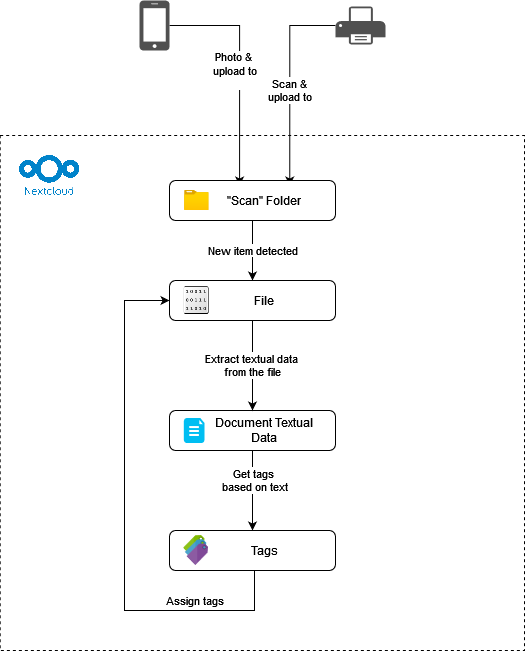
When the picture is taken from the smartphone, it will go automatically to the “Scan” folder in Nextcloud instance. Then, the system will detect a new file from there and start the tag determination process (text extraction and tag determination based on the text).
Implementation
The schema bellow explain the services implies in the solution:
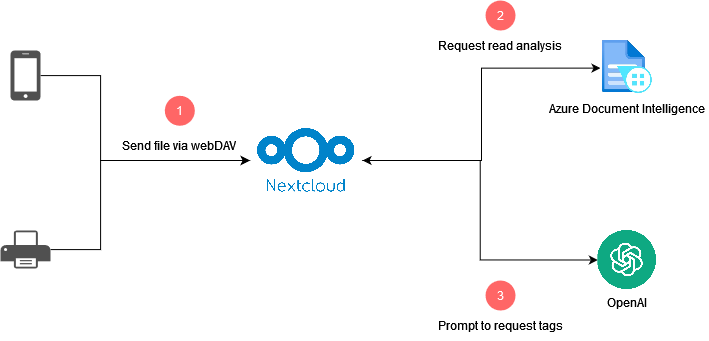
- Nextcloud for files management
- Azure Document Intelligence for text extraction
- OpenAI API for tags determination
Creation of the plugin
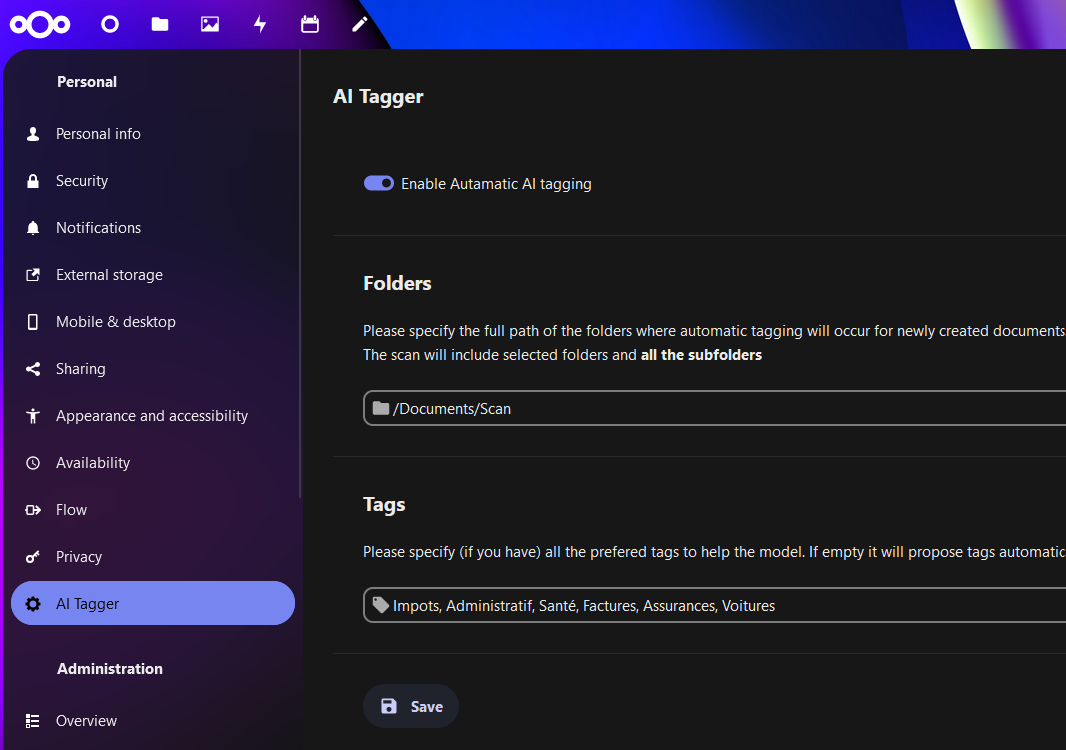
The plugin to create should allow to:
- Detect new files from a folder
- Set a list of pre-defined tags
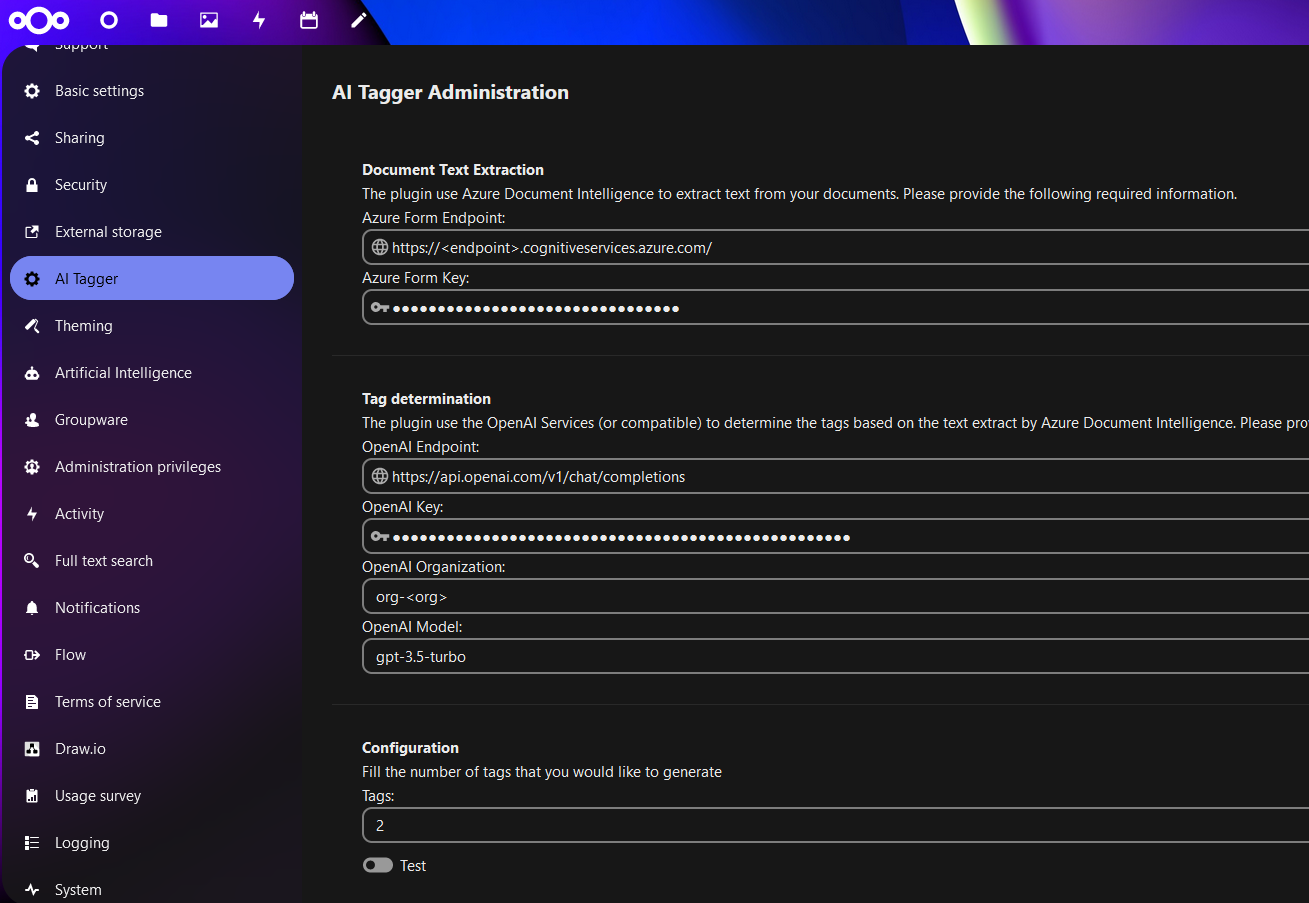
- Set API Key, Endpoints, … for OpenAI and Azure Document Intelligence
To create the plugin from scratch, I followed the official guide as starting point. The Nextcloud PHP API Documentation and Nextcloud Vue Style Guide were also very helpful.
Detect new files from a folder
An Event Listener is used to assign tags to newly created files based on their content using an AI model. Here’s a description of the code:
-
The class declaration:
- Implements the
IEventListenerinterface from the OCP EventDispatcher.
- Implements the
-
The method
__construct():- Initializes required services (Dependency Injection).
-
The method
handle(Event $event):- Checks if the application is activated for the user.
- Filters files based on user-defined folders.
- Reads file content to get suggested tags using the AI tag manager.
- Assigns tags to the file using the system tag manager and object mapper.
-
The method
assignTags(string $fileId, array $tags):- Retrieves existing tags from the system tag manager or creates new ones if they don’t exist.
- Assigns the tags to the file using the system tag object mapper.
Azure Document Intelligence
To create a service using Azure Document Intelligence, the steps bellow can be followed:
- Sign in to Azure Portal: Go to the Azure Portal at https://portal.azure.com and sign in with your Azure account credentials.
- Create a Resource: Once logged in, click on the “+ Create a resource” button on the upper left-hand corner of the portal.
- Search for Document Intelligence: In the Azure Marketplace, search for “Document Intelligence” or navigate to the AI + Machine Learning category.
- Select Document Intelligence Service: Choose the Document Intelligence service from the list of available services.
- Configure Service: Click on the “Create” button to start configuring your Document Intelligence service. You will need to provide details such as subscription, resource group, region, pricing tier, and other configurations as required.
- Review and Create: After configuring the service according to your requirements, review the settings, and click on the “Create” button to provision the service.
- Wait for Deployment: Azure will now deploy your Document Intelligence service. This process may take a few minutes.
- Access Service: Once the deployment is complete, navigate to your resource group in the Azure Portal. You should see your Document Intelligence service listed there. Click on it to access the service.
- Use the Service: Get the Endpoint and API Key to be configured in the plugin
Note: this is a paid service but there are 500 pages free per month using S0, which is far enough for personal use.
OpenAI API
To use OpenAI API, we need an API Key that can be generated as bellow:
-
Sign Up or Log In: If you haven’t already, sign up for an account on the OpenAI website (https://openai.com/). If you already have an account, log in.
-
Access API Settings: Once you’re logged in, navigate to the API settings page. This page is where you can manage your API keys and access other API-related settings.
-
Generate API Key: On the API settings page, look for the option to generate a new API key or access token. Click on the appropriate link to generate a new key.
Note 1: Do not forget that the service has a cost. You can use the Usage Monitor to follow the consumption & price.
Note 2: In PoC, I currently utilize the OpenAI API to generate the tags. However, the long-term plan involves implementing a local LLM server for enhanced privacy and security. By running an LLM locally, I will minimize data transmission and ensure that sensitive information remains within my controlled environment.
When the service is ready on the plugin side, it’s important to have a good & efficient prompt. The one bellow as been used:
System Prompt: “You will return the tags in JSON array in the “tags” attribute. Tags will be in lanaguage: –LANGUAGE–”"
User Prompt: “Give me –NUMBER OF TAGS– tags in the ’tags’ attribute that describe the document extracted bellow : \n –TEXT CONTENT –”
Result in pictures
For the demonstration, this Invoice Template as been used.


Conclusion (and improvements)
The current development represents a Proof of Concept (PoC) that demonstrates the potential for innovation and enhancement. It’s currently limited, there are of course many opportunities for improvement and expansion.
Integrating a vector database could significantly enhance the system’s capabilities by enabling efficient storage, retrieval, and analysis of data. This addition would not only improve performance but also facilitate more sophisticated operations such as similarity searches and clustering.
Furthermore, leveraging local Large-Language Model (LLM) usage can enhance privacy & reduce latency (with the right hardware). By deploying LLMs locally, we can gain greater control over their data and computational resources, leading to a more seamless and secure experience.
Additionally, incorporating local text extraction directly from documents offers the same advantages. This approach empowers users to tailor text extraction algorithms to specific requirements, ensuring accurate and reliable results across diverse document formats and languages.
The full source code is available here.
Within the coming months, we should see a lot of interesting features coming in Nextcloud around Generative AI: Details there.